Pressbooks for Academic Publishing
Visual & Text Editors
Visual Editor
The visual editor is the default editor. It is a WYSIWYG (What You See Is What You Get) interface that allows you to see styling and formatting as they are applied.
This interface also includes a toolbar that the top of the editor. While most options are straightforward, there are a range of buttons whose functions might not be obvious at first. Below is a guide to each of the toolbar functions, and where you’ll find them.
NOTE: While much of this formatting is possible in other programs, such as MS Word, applying it in the Pressbooks editing interface ensures it will function correctly in all outputs.
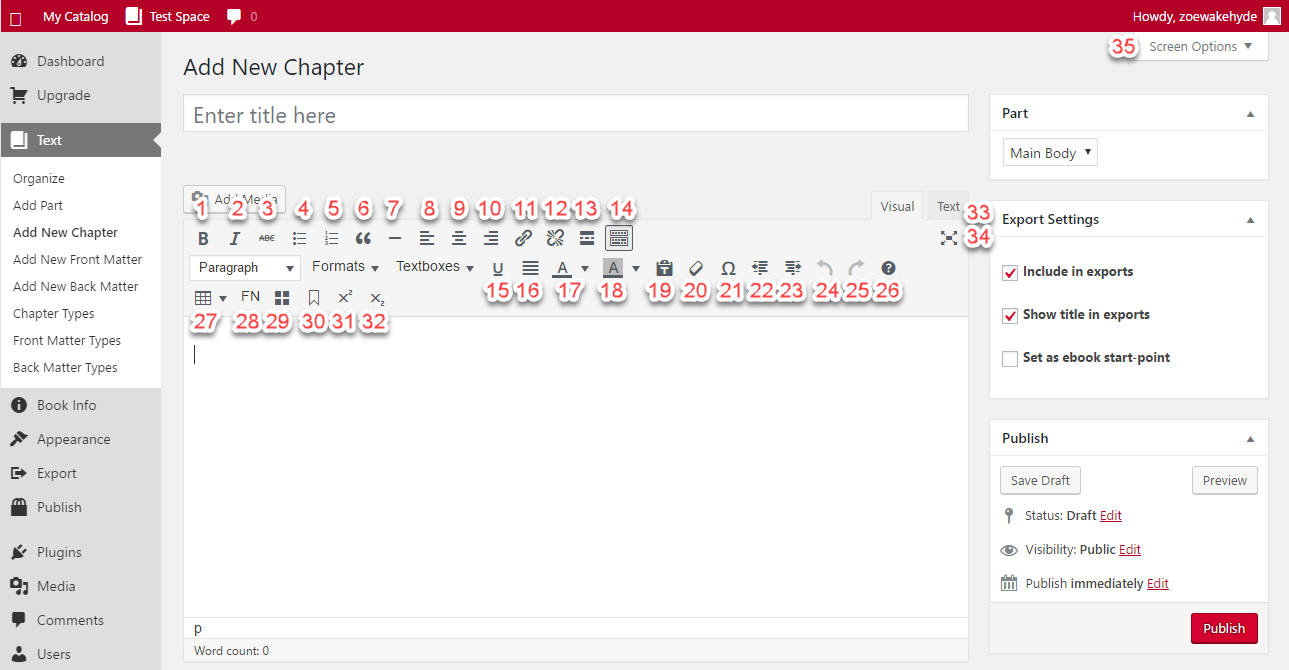
- Make your text bold
- Add italics
- Add a strikethrough to text
- Start a bulleted list, or converted higlighted text to a bulleted list
- Start a numbered list, or converted higlighted text to a numbered list
- Insert a blockquote
- Insert a horizontal line (between paragraphs)
- Left-align your text (default)
- Center your text
- Right-align your text
- Create a link (highlight your text before clicking and insert the link when prompted)
- Remove a link (this can also be done by clicking on the link, then clicking the ‘X’ that appears)
- Insert a “Read More” tag (beta)
- Toggle toolbar to display more options
- Underline text
- Justify text (note: text is automatically justified in PDF outputs)
- Change the colour of your text
- Highlight text by adding a coloured background
- Paste copied content as text (without keeping any formatting)
- Clear any formatting from text
- Open the special characters menu
- Decrease the paragraph indent
- Increase the paragraph indent
- Undo last action
- Redo last action
- Open the ‘Keyboard Shortcuts’ menu
- Insert and edit tables (see our guide chapter for full uses)
- Insert a footnote, or convert highlighted text to a footnote
- Convert MS Word footnotes to the Pressbooks format
- Insert an anchor tag
- Type in, or convert higlighted text to supercript
- Type in, or convert higlighted text to subscript
- Switch to the Text Editor
- Enable the ‘distraction free writing mode’, which removes everything from the screen but the chapter editor.
Text Editor
As an alternative to the visual editor, you can also work in a text editor, or switch to it as necessary for specific needs. Here, you can view and edit the HTML version of any text written and formatted in the visual editor, and you can also write directly in HTML, using the toolbar as necessary.
The text editor toolbar offers fewer options, tailored to working in HTML. They are detailed below.
NOTE: While you can work in HTML directly, not all HTML will work in all exports. We recommend keeping it simple, and using the tools available in the visual editor as a guide.
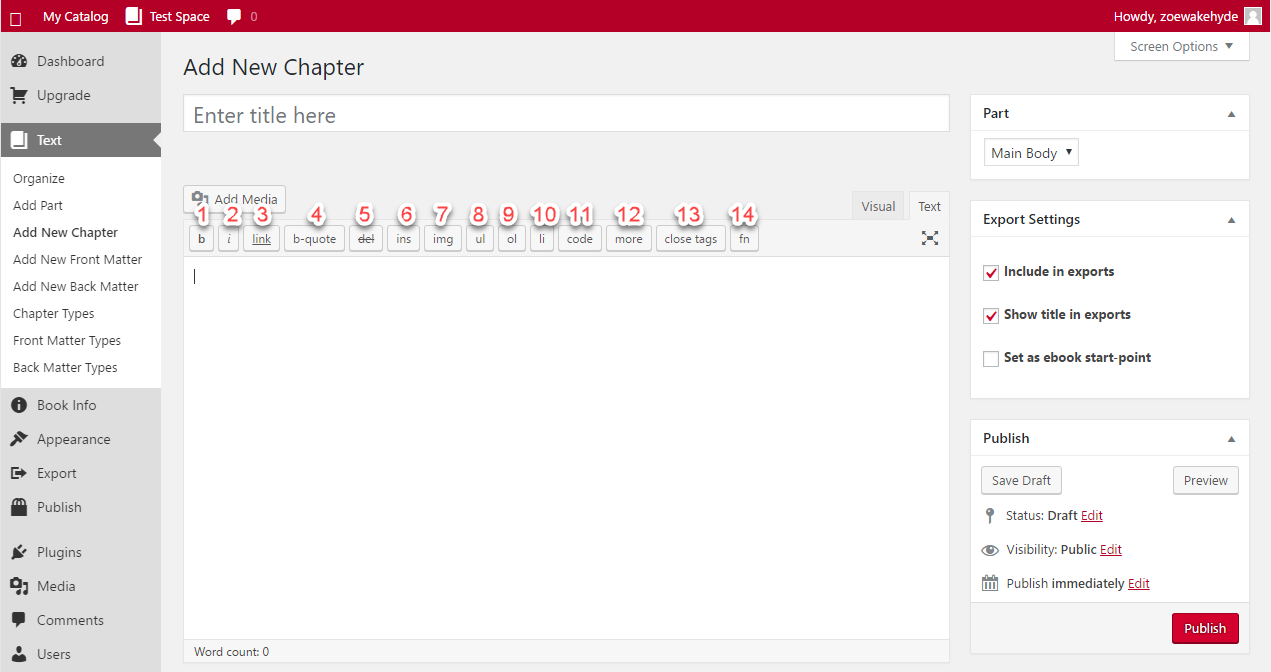
- Open and close <strong> tags to make text bold (click once to open, and again to close the tag)
- Open and close <em> tags to make text italics
- Link text (a pop up will appear)
- Insert the blockquote tags
- Strikethrough text (also adds a date and time marker)
- Insert a date/time tag
- Insert an image (from URL)
- Insert a bulleted list
- Insert a numbered list
- Add list item
- open and close <code> tags, to style text as code
- Insert a ‘Read More’ tag (beta)
- Close tags (automatically closes any open tags)
- Open and close footnote shortcode
